Endurance vs Strength: What’s Most Important for the Trail?
You want to get in shape for hiking, but you’re wondering, “What’s most important for the trail… exercises to build endurance or strength?”
When training for a specific sport or activity it’s common to think…
“What exercise is most important?”
“Where should my primary focus be?”
“How should I spend the bulk of my time training?”
Instead, you really should be thinking about a total-body approach that aims at improving all your fitness markers.
That’s not saying that your workouts can’t be tailored to a specific sport (they actually should be), or that you can’t place emphasis on one area more than another. But, understanding the benefit and value of each exercise component will help you better structure your workouts, and make the most of your training.
Endurance vs Strength
First, it’s important to recognize that endurance can describe two separate physiologic adaptations that can take place in the body: Cardiorespiratory endurance (heart/lungs) or muscular endurance.
Cardiorespiratory endurance
This is the process of efficiently supplying oxygenated blood to working muscles and removing carbon dioxide and other metabolic byproducts from the body during exercise. (Learn more here)
MUSCLE ENDURANCE
This is defined as the muscle’s ability to sustain repeated contractions (aka “work”) for an extended period of time without fatigue.
MUSCLE STRENGTH
This refers to the muscle’s ability to exert force during a single contraction. (Learn how to build and maintain muscle at any age.)
So, what’s MOST important when it comes to hiking fitness?
ANSWER: This may surprise you, but they are equally important!
Since hiking is predominately an endurance activity, training your heart and lungs to be efficient and building stamina in your leg muscles makes obvious sense.
However, establishing foundational strength and developing power is also very beneficial.
Also, muscular strength compliments muscular endurance.
Here’s how:
- Each step becomes more powerful and effective— Increased force (aka strength) during the drive phase of a movement will improve overall endurance.
- Proper muscle engagement during repetitive motions (like walking/hiking) will minimize joint discomfort, wear-and-tear, and the potential for injury— Muscles are responsible for proper knee joint tracking during movement, and they act as shock absorbers for the joints. (Learn more here)
My approach to coaching clients towards increasing their hiking fitness involves a wholistic, sustainable, progressive, and goal-oriented plan. A plan that ALWAYS includes cardio, strength, stability and mobility exercises. (I know that sounds like a lot, but an expertly designed plan will have exercises that serve dual purposes.) PLUS, there’s a bonus to training this way— it can make everyday tasks of living easier and improve your overall health and wellbeing.
Below I’ve provided a couple of basic, yet very effective, lower-body exercises that are great for building muscular endurance and strength in key muscles that you rely on for hiking.

PRO TIP: Typically exercises that focus on muscle endurance are done at a higher rep range and lighter resistance. If the emphasis is on building muscular strength, the exercises will have slightly lower rep ranges with a progressive increase in resistance.
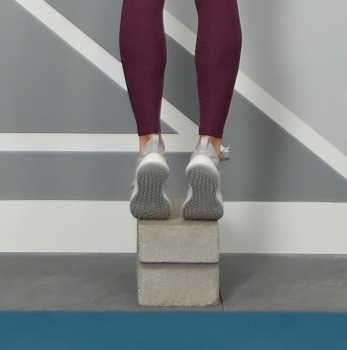
Calf Raises
OVERVIEW: The calf muscles assist with power and stability during all walking, running, or hiking activities.
Hiking Relevance: Building endurance and strength in the calf muscles will prepare you for uphill climbs and long days on the trail.
Hiking Relevance: Building endurance and strength in the calf muscles will prepare you for uphill climbs and long days on the trail.
Focus: Calf muscles (back side of the lower legs); Ankle mobility
Sets: 1-3
Reps: 10-15 (To further build endurance in the calf muscles, you can build up to higher rep ranges or perform until you reach full muscle fatigue with each set.)
Movement pattern:

- Stand with your feet hip-width apart and toes painted straight ahead. Slowly lift your heels off the floor and transfer the weight to the ball of each foot, pause, and then slowly and with control lower the heels back down.
Cues/Tips:
- The movement up and down should be slow and controlled; don’t let just let gravity lower you back down.
- Gradually work to increase the number of repetitions, and then sets.
Modification: Use a wall or chair for support.
Progressions:
- Elevated calf raises: Perform on a step with heels extending off the edge. This also helps increase ankle mobility.
- Single-leg calf raises
- Add weight (hold weights in hands or add weight to a backpack).
- Single-leg hops (a dynamic calf exercise that builds power in the leg muscles and also improves ankle stability).
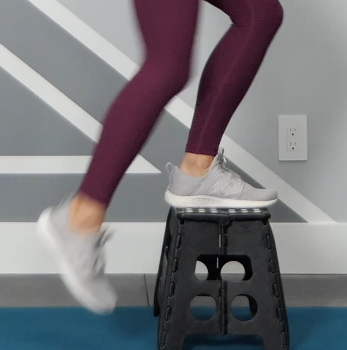
Step-Ups
OVERVIEW: This is a fundamental exercise that builds strength and power in the leg muscles. It trains the functional pattern that directly translates to movements on the trail.
Hiking Relevance: Hiking involves repeatedly stepping up and over objects on the trail, and steeper sections of trail will require bigger steps “up” and a more powerful drive.
Focus: Glutes & quads; Balance; Ankle & knee stability
Sets: 2-3
Reps: 8-12 each side
Movement pattern:

- Place your left foot firmly on a sturdy box. Use the power of this leg to initiate a strong drive up. Don’t push or “spring” off the ground with your right foot. Pull the right leg up to step height or drive the knee up at the top.
- With a slow and controlled movement lower the right foot back down to the floor.
- Repeat one full set before switching legs. (Note: Typically when you are going up and down stairs you use the assistance of momentum to propel yourself up and gravity to lower down. But by forcing yourself to slow this movement down and not using “assistance”, you will isolate the stabilizing muscles of the hips and knees.)
Cues/Tips:
- Make your muscles work hard to keep good knee alignment. The knee should track in line with the foot; don’t let it drift in.
- Keep your hips/pelvis level.
- Keep your torso upright; don’t hunch or lean forward to “propel” the movement.
- Don’t “spring” off the ground foot.
- The box height should not be too high. (With one foot placed on the box, your hip-torso angle should be 90 degrees or more.)
Modification: Lower the height of the box.
Progression: Add weight (dumbbells or backpack loaded with weight)
Want even more hiking related exercises and information?
- Check out additional articles on my fitness blog.
- Sign up (see below) for my Hiking Fitness Newsletter (BONUS: You’ll receive my ebook “Trail Body” for free!)
- And, if want even more hiking related exercises, weekly training schedules, and instructional videos… enroll in my HIKE-ABILITY Training Program. It’s designed specifically for hikers who want to be confidently prepared and fit for the trail.
The trail awaits… be ready for it!
Kristen, CPT and creator of the HIKE-ABILITY Training Program

Disclaimer: All information, content, and material (including associated text, videos, and links) on this website is provided in good faith and is for informational and educational purposes only. It is not intended to serve as a substitute for the consultation, diagnosis, and/or medical treatment of a qualified physician or healthcare provider. All exercise has inherent risks. Before beginning any type of exercise, please consult your health care provider.


Leave a Reply